Iris 2 (or just Iris for short from now on) is a fantastic software synthesiser from iZotope, a company that is famous for creating some of the most interesting audio plugins for mixing and mastering. Iris is a sample based synthesiser (well, a sampler, if you will), at a first glance not much unlike Kontakt or ESX24, but in addition to the sampler it offer something truly special called Spectral Modelling Synthesis (SMC), which is the ability to synthesise a sound by altering its harmonic content on the frequency domain.
In Iris, SMC takes the form of a graphical editor that displays the harmonic content of the sample that is currently edited with tools that allow you to select or remove parts of the sound. This create some kind of “perfect” band pass filter that only pass the selected content when the playhead hits the filtered region: anything that is outside of the filter is muted, whatever is left inside passes trough (Fig. 1).

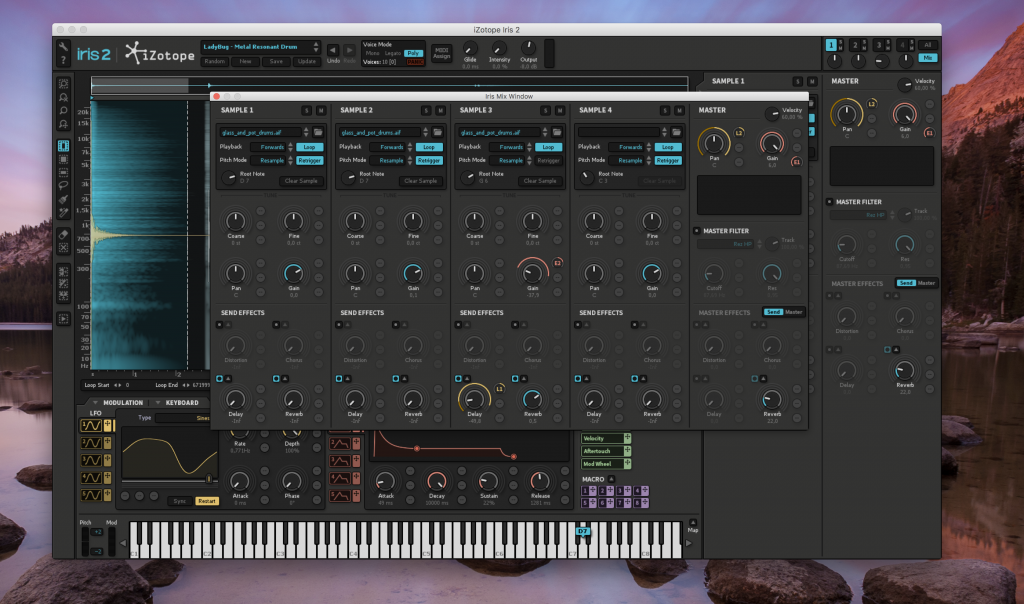
The signal chain is familiar, you can have up to four samples loaded in four different “channels”, each one with a dedicated effect section, and finally a mix stage with a master effect section, as you can see in Fig. 2. You can control how each sample will be played by selecting its root note, the note that plays the original sample on the MIDI keyboard – Iris will do its best to find one for you, and most often is pretty capable at doing it unless the sound is very complex or full of harmonic content, like atonal sources or recordings of multiple sources – and the “direction”, for instance if you want to play the sample backward, forward, backward and forward or forward and backward; you can also loop the sample, in which case it will play again following the mode you selected, while the graphical editor contains all the controls you would generally expect for things like sample start/end, cross fade, offset and delay, which is a useful tool to correlate the current sample to the other samples. There is no facility to “jump” to portions of the audio file, which is something that would be nice given that you can otherwise arbitrarily select specific regions of the sample, but if this is required, the solution is to simply edit the sample externally so that the part that you want to play together are actually connected in the sound file itself.
In addition to all those parameters, you have the most important one which is the Sample Pitch function. This is where you select how Iris will play notes that are derived from the root note, and your options are: “Resample”, “Radius RT” and “Fixed”.
“Fixed” is simply what it says, the sample won’t change no matter what note you play. This is mostly useful for some looping and atonal material, but can be used creatively for a number of different sources, especially if you start cutting out harmonic content from the sample. The default mode is “Resample” which is how most samplers work, the sample gets slowed down to produce lower notes and speeded up to produce higher pitches. “Radius RT” is the most advanced mode, it allows you to alter the pitch without altering the speed; this is the most expensive mode in term of CPU, but is also extremely good, especially for sources like rhythmic material that would not benefit from a slow down, but also to ensure some general consistency between the notes. Depending on the source material, all three modes are very useful and can produce wildly different results, you can literally have two otherwise identical patches that sound totally different just because of the pitch shifting algorithm, so experimentation is mandatory.
In addition to the sample signal path, Iris gives the user access to a wide variety of modulation sources, 5 LFOs and 5 Envelopes, 6 macros controllers, which allows you to control multiple parameters within a single controller source, and 4 MIDI controller assignment: pitch wheel, modulation, key tracking and key velocity; all those sources can be used to modulate practically every single parameter in the synth, including the modulations themselves! Each destination offers 3 different slots where you have control on how the sources interact and sum together. Also, Envelope 5 is attached to the main gain stage, so acts as global VCA, but this can be changed if necessary.
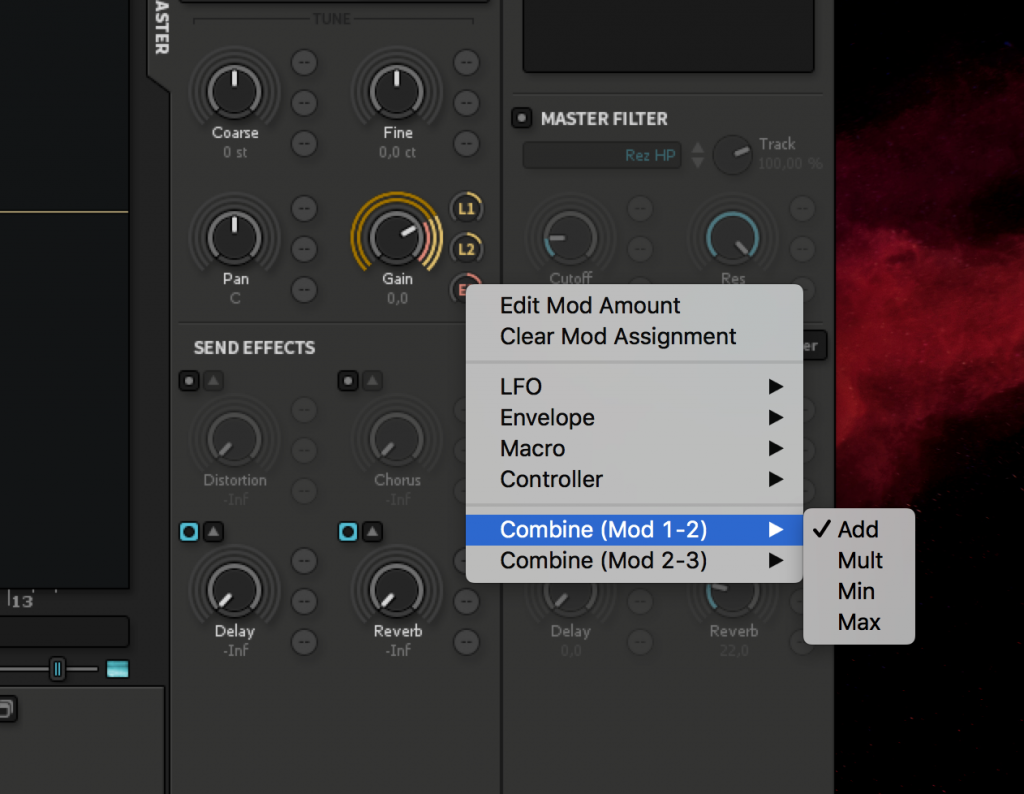
You select a modulation source by clicking on a small “cross shaped” icon representing the modulator, for example the LFO 1, and dragging it to the small round control of roughly the same size, next to each target (see Fig. 3). Once you have a few different modulators in place, you can right click on them and decide how to combine them, with four different options available: Add, Mult, Min and Max. Add and Mult are pretty self explanatory, Mix and Max select respectively the value that is either the smaller or the greater between the two oscillators.
Well, this covers most of the basic of the Iris User Interface already! As you see there’s isn’t really much to say, even if the user interface seems full of controls, it’s very well laid out and makes immediately sense, which is not something that can be said for other samplers.
In the next article we will dig in more detail into some of the controls and see how they can be used to shape the sound. In the meantime, if you have Iris and have read this post all the way to the end, here is a little token of appreciation: you can download one of our patch set for Iris, just click here to redeem your free patches! Let us know what you think about it!