Logic Pro X is a fantastic application, not only every new release is packed with features, quality plugins and an awesome collection of sounds and loops, but is also very affordable compared to the alternatives, especially considering the fact that Apple has been giving away for free every release so far, if you bought that in 2013, when Logic Pro X was releases, your investment has costed you a whopping 29 € per year! If you live in Hamburg that’s less than a coffee per month, but even if you happen to come from south Italy where coffee still cost about 80 cents it won’t bankrupt you either! Of course, the cost of the Mac to run this beast may have bankrupted you instead but that’s probably a story for another time, isn’t it?
The 10.4 update comes in with an incredible number of features and some welcomed redesign, which I find particularly useful for retina iMacs where the previous versions didn’t exactly feel snappier. I will explore some of those features, in particular the new tempo mapping and the new ARA support (Melodyne anyone?) in future posts as well but I will start in this one with the new Articulations feature.
The term articulations refers to the different ways of playing an instrument, styles like flautando or collegno for example, or the use of different brushes and sticks for drums, but of course there is nothing in stone that says that an articulation switch can’t be used to control a patch on your synth or an a MIDI outboard delay unit – particularly in the way they have been implemented in Logic Pro X – since an articulation switch is just a special key switch or trigger (like a CC command) that causes a change in the setting of the target component in some way. For most Kontakt based libraries this is a key switch on the keyboard outside the playable range of the instrument (a Note On message in MIDI terms).
Articulations are a great way to enable expressivity, especially when using sampled instruments like orchestral ensembles or solo instruments, because it is very likely that players will be using a multitude of different styles during their performances, and in fact composers do add the common styles in the music notation as part of the performance instructions, and so being able to change them dynamically in your MIDI score brings you a little bit closer to reality, beside being an invaluable inspirational tool. To understand better what I mean, just try to do the following without ever changing articulations (in particular the fantastic performance at about 7:08 and over):
Logic has had some form of support for articulation switching for a long time, and of course is always possible to send MIDI CC via automation or to draw key switches on the piano roll editor, but the drawback of this approach is that you need to remember which note for which instrument does what, and if you ever rearrange a section you need to remember to also rearrange the articulation key switch. Also, if the key switch is on the piano roll editor, it will appear in the music sheet if you create one from the MIDI data, but of course, this may be a benefit too if you work with other composers by exchanging said MIDI data. With the release of 10.4 the articulation has received a very useful user interface update and now is easily possible to create articulation sets (and save/recall them as needed), without the need to manually remember and find the actual MIDI note, which is even more useful when you don’t have an 88 keyboard, but a shorter one, at hand!
The feature works by recording the articulation ID for each note, so that you can change, per note, the articulation of any instrument plugin. The mapping between an articulation ID and the actual key switch is done on a dedicated mapping editor, and again, since those are essentially control messages you can signal those changes to anything, including external hardware, and decide that the key switches are send only over a specific MIDI channel, for instance.
Let’s see practically how to use this feature works then, I’ll be using as an example the very beautiful Albion V Tundra from Spitfire Audio, this is a fantastic Kontakt based instrument that offer a full orchestra recorded in a very peculiar way (at the edge of silence as they say), and here is their interface for their high woods section:
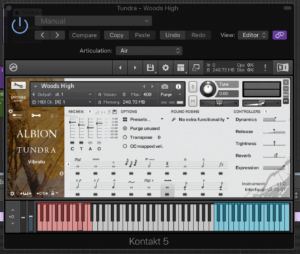
You can see in peach colour the articulations available in this instrument, and yes, they don’t really have standard names, at least not all of them.
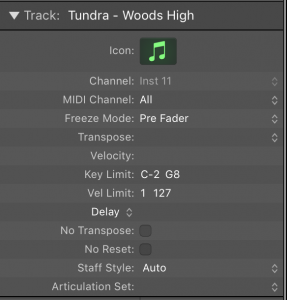
To add a new articulation, open the inspector view, either pressing the “i” key (assuming the default key commands) or by clicking on the “i” sign on the control bar on a MIDI instrument track. At the bottom of the inspector, panel you will now see an “Articulation Set” entry, like in the following screenshot:
Clicking on this will show a menu with the option to create a new articulation set, or, if you already have one, to edit its parameters, save and do other operations. Let’s start with adding a new one, click on “New”:

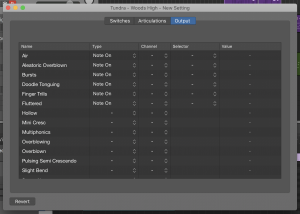
This will open an editor in a new window with three tabs named “Switches”, “Articulations” and “Output”. The “Switches” tab is where we can define the actual key switches, this is useful for instruments that don’t have articulations mapped for example, or probably most interestingly can be used to remap the articulation switches in an effort to standardise across multiple libraries. I admit, however, I never used this tab, and clearly the next two are the most interesting for us.
The central tab, “Articulations” is where it is possible to add a number of articulations and associate an ID to them; the ID will be unique for the articulation set and will be used by Logic to decide what message to send for the articulation change, which is then defined in the “Output” tab. Double click on the default name to change it to suit our needs and then add new articulations as necessary. Each library will have different articulations and switches, and it mostly depend on your provider; in the case of Tundra, the Spitfire website contains a list of all the articulations, but you can also find out the names by clicking on the symbols or on the key switch in the Kontakt user interface, those are in order (again for the high woods):
- Long – Air
- Long – Aleatoric Overblown
- Long – Bursts
- Long – Doodle Tonguing
- Long – Finger Trills
- Long – Fltz
- Long – Hollow
- Long – Mini Cresc
- Long – Multiphonics
- Long – Overblowing
- Long – Overblown
- Long – Pulsing Semi Cresc
- Long – Slight Bend
- Long – Super Air
- Long – Vibrato
- Short – Overblown
- Short – V Short
- Short
It is not necessary to follow this order, since at this phase we are only creating the IDs, the important step of the mapping will be done in the “Output” tab in a second. However, it certainly help to keep consistency, as this is all a very manual and boring step and if you enter things out of order it will be easier to mess things up. Now on to the Output tab:
With the full list of articulation IDs we can now proceed to the mapping. Spitfire Audio mention a “standard” for their articulations, this is UACC, but I don’t think this is an actual real standard, I believe what they actually mean is that this is a convention used in all of their own libraries. I do find this very useful however and I hope other providers will conform to this convention too, we will certainly do for our libraries where this is applicable. I recommend to check out their support page too to see how to configure specifically for Spitfire Audio libraries and UACC.
The first steps are basically the common to most libraries, in the “Type” field of the “Output” page we need to select the type of MIDI message that the instrument accept for the articulation change. In our case, we will set the type to “Note On”, however Note Off, Poly Pressure, Controller, Program, Pressure and Pitch Bend are also available. The “Channel” field can be left blank here, this is to restrict to a specific MIDI channel (up to 16 channels, from 0 to 15) the articulation switch message, for example if an instrument supports a full 88 keys playable range on Channel 1 but allows for articulation changes via Note On on Channel 2.
The “Selector” in this case is the note identifier. For Tundra the first identifier is C-2, the second is C#-2 and so on in ascending order, or you can use the UACC as defined in the Tundra manual which means setting the note to the same value for each articulation. The final filed is the “Value”, you can leave this blank too or just fill it up with 0, it doesn’t really matter in this case since we are using different notes, however if we were using the UACC convention mentioned above, or if your library uses for some reason the same note for two separate articulations, we would then need a different “Value” to differentiate (say 0 and 127, for example).
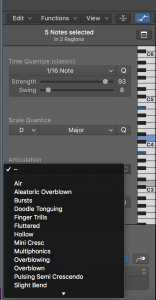
This is it! Once you have filled up all the details, you should have the articulations appear in the “articulations” drop down control in the piano roll, as well as at the top of the instrument plugin window:
When you play, you can actively change the articulation per note, this means the data for the articulation switch will be stored in the metadata for the note, however as far as I can see it is not exported to the MIDI track, it is nevertheless noted in score editor if you add the proper symbol in the “Articulations” tab; also, I found out that this last drop down menu is only filled with the names (as opposed to just the IDs) when you are on an active MIDI region, I think that this may be a bug and will be fixed (hopefully) in a future update, but in case you only see numbers and not names, try to create an empty MIDI region first and select it in the track lane.
The final step is to save this articulation set, this is once again done in the Inspector, selecting “Save As …” from the drop down menu. An added bonus that I suggest is to also save the full instrument as a library patch. This way all the settings, including the articulation set, will reappear next time you load the instrument, as some form of mini template (assuming you will be using this library more than once, in the case of Tundra I certainly would do!): just press “y” or click on the library button on the control bar, and press “save” at the bottom on this panel, this will create a user preset that can be recalled any time.
That’s all for this time!